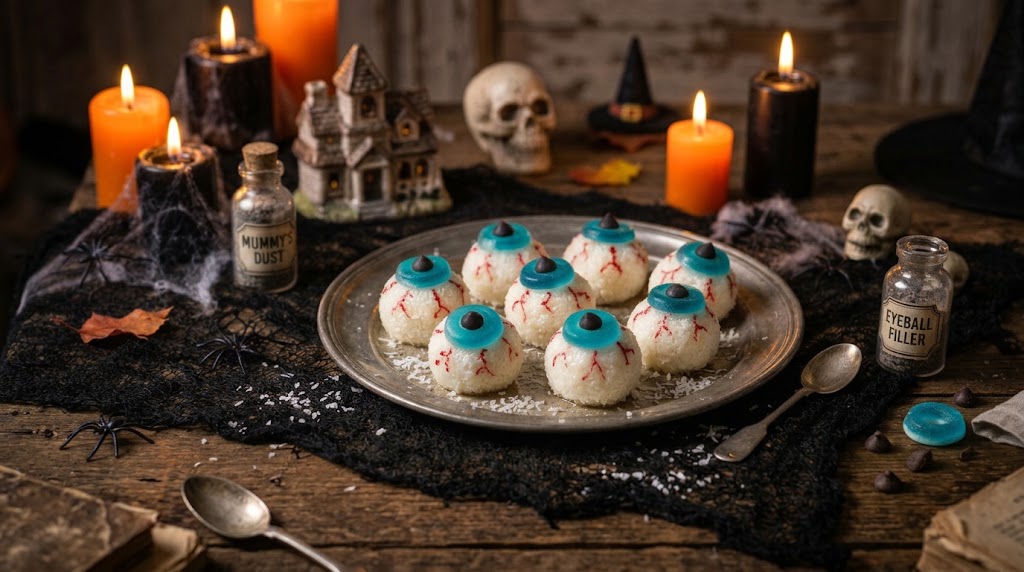
Coconut Ice Halloween Eyeballs
by J_C • 2026
Why some badges are missing
- Not vegan: condensed milk → try oat milk
- Not dairy-free: condensed milk → try oat milk
- Not low-FODMAP: condensed milk → try lactose-free milk
- Not low-histamine: dark chocolate chips or black round sweets
- Not low-GI / diabetic-friendly: icing sugar → try granulated sweetener (such as erythritol)
- Not kidney-friendly: condensed milk → try rice milk
Based on listed ingredients — always check labels for allergies.
About this recipe
Creep out your party guests with these deliciously gruesome Halloween Coconut Ice Eyeballs! Made by combining sweet condensed milk, icing sugar, and desiccated coconut into a soft, bite-sized sweet, these no-bake treats are topped with gummy ring irises and chocolate chip pupils. Painted with eerie, bloodshot red food colouring veins, they are equal parts spooky, sweet, and fun!
Prep
20m
Cook
0m
Rest
120m
Serves
Rating
—
Total time · 20m
Ingredients
Kitchen HelpShopping list
250 g icing sugar — sifted
250 g desiccated coconut
400 g condensed milk — (1 tin)
0.5 tsp vanilla extract
16 units gummy sweets or jelly rings — blue, green, or hazel coloured for the irises
16 units dark chocolate chips or black round sweets — for the pupils
1 tbsp melted chocolate — for sticking pupils
1 tube red gel food colouring or red writing icing — for the veins
Tools
- · mixing bowl
- · wooden spoon
- · baking tray
- · baking parchment paper
- · fine paintbrush or toothpick
Instructions
Step by step
- 1
Make the Coconut Ice Mixture: In a large mixing bowl, combine the sifted icing sugar and desiccated coconut. Pour in the condensed milk and vanilla extract. Stir the mixture thoroughly using a wooden spoon, then switch to using clean hands to knead everything together until it forms a stiff, cohesive, and slightly sticky dough. (If the mixture feels a bit too wet to hold its shape, roll in an extra tablespoon of desiccated coconut).
- 2
Shape the Eyeballs: Line a baking tray or large plate with baking parchment paper. Scoop out tablespoon-sized portions of the coconut ice mixture (roughly 30g each). Roll the portions firmly between your palms to create smooth, round eyeball-sized spheres. Place the balls onto the prepared baking tray. Gently flatten the top of each sphere slightly so your candy iris will rest securely on top.
- 3
Construct the Irises and Pupils: Place a gummy ring or round jelly sweet flat onto the flattened top of each coconut sphere to form the iris. Press down gently so it adheres to the coconut dough. Dip the flat base of a dark chocolate chip (or small round black sweet) into a tiny dab of melted chocolate or condensed milk, then press it securely into the centre of the gummy ring to create the pupil.
- 4
Paint the Bloodshot Veins: Dip the tip of a fine-line paintbrush or toothpick into the red gel food colouring or red writing icing. Carefully draw thin, squiggly red lines starting from the base of the coconut sphere working upwards towards the iris to resemble eerie, bloodshot veins.
- 5
Chill and Rest: Transfer the tray to the refrigerator and let the eyeballs chill for at least 2 hours (or overnight) until they firm up completely. Once set, arrange your creepy coconut eyeballs on your Halloween platter and serve cold!
Per serving
serves 18AI estimate only — not medical advice. Figures are approximations based on standard ingredient data and may vary by brand, portion size and preparation. Always double-check if cooking for allergies, diabetes, or strict dietary needs.
Tagged

Rate this recipe
Shared notes
Cook's annotations
No notes yet.
Family legacy
Audio reminiscence
A short voice memory — Mum reading the recipe out, a grandparent sharing the story behind it, a tip whispered while cooking. Up to ~60 seconds.
No audio memory yet.
Complete the table
Smart wine & side pairings
Evolution timeline
How this recipe has changed
Edit on 2026-10-23
Edited 10/23/2026, 6:01:00 PM