Biscuit Mosaic Recipe
by J_C • 2026
About this recipe
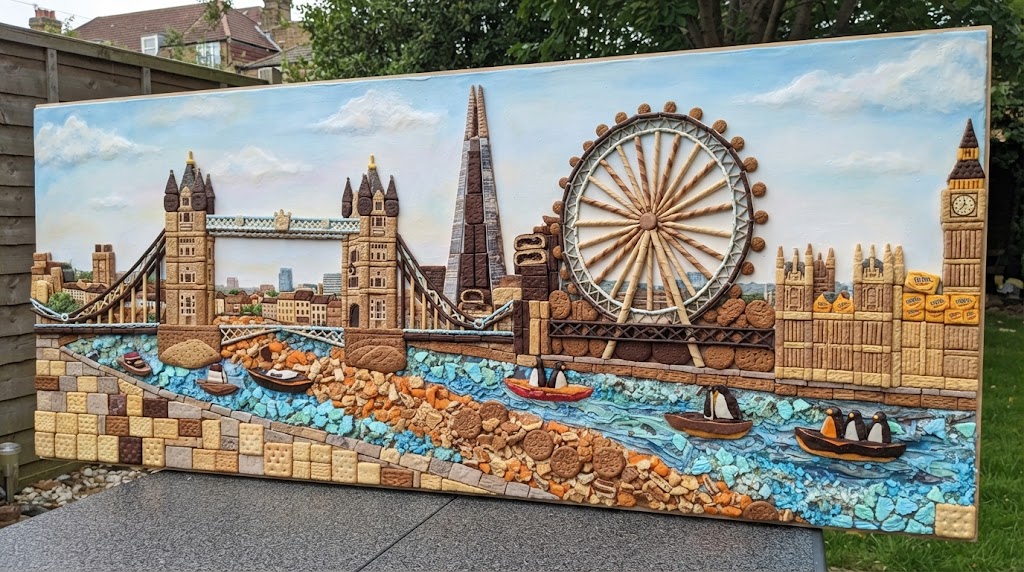
This intricate London skyline mosaic is constructed entirely from common UK shop-bought biscuits, using their varying colours, textures, and shapes to create the architectural details. No baking is required, only careful construction and 'mortar'.
Tips: Here are top expert tips to ensure your biscuit mosaic London skyline goes together smoothly and stays structurally sound:
Control Moisture: UK biscuits absorb moisture from royal icing quickly. If your icing is too wet, the biscuits will go soggy and collapse. Keep your royal icing on the thicker side (stiff peak stage) so it acts like a proper cement mortar.
Pre-Cut and Score: Always score and cut your biscuits (like the Mikado sticks or Custard Creams) before applying them to the board. Trying to snap or cut a biscuit once it's already glued down will crack your structure.
Work in Stages: Build the heavier base layers (like the bridge piers, massive stone blocks, and lower pavement) and let them dry for a few hours before attempting to stack taller elements or attach delicate suspension cables.
Use Melted Chocolate for Speed: While royal icing is great for structural weight, melted chocolate sets faster for smaller, lightweight elements like sticking Chocolate Fingers to the Shard or securing boat details. Just let it cool slightly so it doesn't melt the biscuit creams.
Support Tall Structures: For tall landmarks like the Shard or Big Ben, consider building a hidden internal spine out of a thicker biscuit or a wafer roll to give the structure vertical stability before cladding it with your facade biscuits.
Protect the Surface: If you are using a wooden board or canvas, give it a light coat of clear sealer or greaseproof paper barrier so the oils from the biscuits don't seep into the canvas over time.
Prep
360m
Cook
0m
Rest
120m
Serves
Rating
—
Total time · 6h 0m
Ingredients
Kitchen HelpShopping list
3 packs Custard Creams — large (400g) – Tower Bridge, Parliament, Big Ben walls
2 packs Bourbon Creams — large – Dark contrast details and Shard core
2 packs McVitie's Digestives — standard – Base layers and crushed riverbanks
1 pack McVitie's Hobnobs — standard – Rocky foreshore texture
2 packs Malted Milk — standard – Light-tan uniform paving
1 pack Rich Tea — standard – Smoother paving alternative
1 pack Nice Biscuits — standard – Decorative roofline siding
2 packs Chocolate Fingers — standard – Glass panels for The Shard
3 boxes Mikado Sticks — Suspension cables and Eye spokes
2 packs Wafer Rolls — London Eye outer rim
1 pack Chocolate Digestives — standard – Bridge piers
1 pack Jaffa Cakes — Riverboats
1 pack Penguins — Riverboats
1000 g Royal icing sugar
2 tubes Blue gel coloring
2 bags Fox's Glacier Mints
Tools
- · Sturdy board
- · thick royal icing
- · melted chocolate
- · serrated knife
- · offset spatula
- · piping bag
- · small brush
Instructions
Step by step
- 1
Phase 1: Foundation
- 2
Sketch Skyline: Lightly outline landmarks (Tower Bridge left; Shard, Eye, Parliament, Big Ben right).
- 3
Build Riverbank: Apply icing to bottom third. Lay whole Rich Tea/Malted Milk for the embankment, and scatter crushed Digestives/Hobnobs for the foreshore.
- 4
Lay River: Apply blue royal icing in the center and sprinkle crushed blue mints while wet for water texture.
- 5
Phase 2: Building Structures
- 6
Tower Bridge: Stack whole Custard Creams for towers. Add halved Bourbons/Chocolate Digestives for arches, scored Mikado sticks for cables, and stacked Chocolate Digestives for roadway supports.
- 7
Parliament & Big Ben: Stack Custard Creams for facades, top with Nice biscuits for roofs, and build Big Ben with a small pyramid top.
- 8
London Eye: Curve and adhere Wafer Rolls for the rim, attach snapped Mikado for spokes, and use chocolate sweets or halved Bourbons for pods.
- 9
The Shard: Create a vertical chocolate biscuit stack lined with vertical Chocolate Fingers for glass facades.
- 10
Phase 3: Final Touches
- 11
Paving & Boats: Extend Malted Milk and Rich Tea paving to the right. Secure halved Jaffa Cakes and Penguins onto the water as boats.
- 12
Drying: Let the mosaic dry for at least 24 hours so the royal icing hardens completely.
Per serving
serves 4AI estimate only — not medical advice. Figures are approximations based on standard ingredient data and may vary by brand, portion size and preparation. Always double-check if cooking for allergies, diabetes, or strict dietary needs.
Rate this recipe
Shared notes
Cook's annotations
No notes yet.
Family legacy
Audio reminiscence
A short voice memory — Mum reading the recipe out, a grandparent sharing the story behind it, a tip whispered while cooking. Up to ~60 seconds.
No audio memory yet.
Complete the table
Smart wine & side pairings
Evolution timeline
How this recipe has changed
Edit on 2026-10-04
Edited 10/4/2026, 12:44:56 PM